This setup guide demonstrates how to configure an IP camera. The screenshots used were taken from an ICRealtime camera, however, the same settings can be applied to most brands. Camera brands that will present the settings very similarly are Clearview, Dahua, Hikvision, and Qsee.
Our latest settings guide shows how to use Office 365 for email notifications.
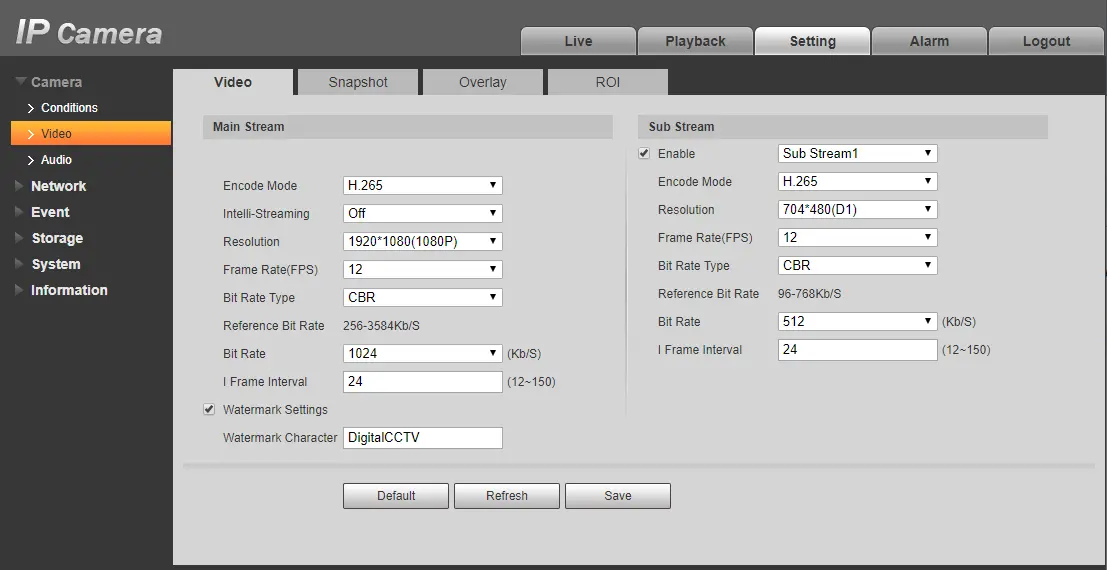
IP Camera: Video Encode Settings
Everyone’s instict is to turn these settings up as high as they go, but less is sometimes more. What we want to focus on is providing a smooth, crystal clear image that uses the least amount of bandwidth possible. The image at the top of the page is a screenshot of the IP Camera settings I typically use.
As you can see, the Main Stream and Sub Stream are separated into two columns. The Main Stram is typically what’s used for recording, which makes image quality of high importance. The substream is most commonly used to view the camera feed over the internet, which makes bandwidth management of greater importance than image quality.
The aggressiveness at which image quality or bandwidth is prioritized is based on the usage and the network environment. For example, if we have an office with a single IP Camera that records to an SD card then bandwidth becomes less important. Likewise, if we have an office that has 64 cameras recording to an NVR then bandwidth management becomes critical. Most real life use cases will lie somewhere in between.
Keep in mind, that bandwidth usage directly relates to storage consumption. An IP camera outputting 4096 Kb/s will require four times the storage capacity as an IP camera streaming at 1024 Kb/s over the same amount of time.
Encode Mode
My default IP camera encode mode is H.265.
Always choose the highest level of compression in this order: H.265, H.264H, H.264, and MJPEG. The only reason to go down a compression level is if there’s a compatibility issue. For instance, certain viewing software may not be able to view recorded H.265 footage, in which case defaulting to H.264 may be necessary.
Some 3rd party integrations may only support MJPEG streams. In this case, it’s best to leave the Main Stream at a high compression level and to set the 3rd party device to retrieve the Sub Stream, which in this case should be set for MJPEG. The MJPEG format should be avoided unless absolutely necessary.
Resolution
My IP camera default resolution settings is always the highest available, which is usually 1080P (1920 x 1080).
Generally, IP Cameras should be set to the highest available resolution. However, if you can lower the resolution without any noticable loss in quality (check zoom too) then there’s no reason not to lower it.
For the Sub Stream, resolution may need to be adjusted to fit a preferred aspect ratio of a particular viewer. Most viewers are designed to be cable with a D1 resolution, which is 704 x 480. This is about 1/3 MP and fairly close to a 4:3 aspect ration (16:11).
Frame Rate
My default IP camera frame rate is generally 12-15 FPS on the Main Stream and 10-12 on the Sub Stream.
There’s almost no reason to use the highest frame rate available. Consider the purpose of your IP cameras and decide if it needs to be cinema quality, and if being cinema quality is worth the bandwidth and storage consumption that comes along with it.
The frames per second setting will affect how smoothly motion is captured. If the IP Camera is above a cash register, then a higher frame rate might be necessary to catch fast moving hands. Likewise, if it’s an IP camera in a low traffic storage room then a higher frame rate just isn’t necessary and I’d prefer to save bandwidth and storage.
I find that a frame rate of 15 FPS is sufficiently smooth to capture fast moving hands, and that a frame rate of 10 FPS is sufficient low traffic areas.
If video is too choppy, raise the frame rate by 10% until it is smooth. Remember though, it’s not cinema.
Bit Rate
My default bit rate is generally 40% of the range provided by the camera. For MJPEG strams, I’m generally at 75%.
The Bit Rate setting is direct control over the bandwidth consumption of the IP camera and should be set as low as possible without negatively affecting the image.
Most IP Cameras will take the current settings into account and then recommend a range for the bit rate. To start, set your bit rate at the upper 75% mark of the range. Check the live view, and see how the picture looks.
Then, adjust the bit rate to the 40% mark of this range. See if there’s any noticable difference. If there is not, then leave it here. If there is, then start trying to find something in the middle. Generally, IP Camera bit rates should not go below 40% or above 75%.
If the IP Camera does not offer a suggested range then for a 2MP using H.265 at 15FPS start at 2048 Kb/s. Lower to 1024 Kb/s to see if there’s a difference. Double these values for a 4MP IP Camera, and add 50% if using H.264

interesting post, thanks for sharing.
Pingback: How To Fix Antivirus Software Blocking Your Camera – Computer Forensics World
what program is this and does work on all security cameras,i have a genbolt camera and the software is garbage
thks
bill
Just seeing this now, Bill. This is a Dahua camera, and this is the web gui. These settings are generally similar for all IP cameras, but may appear slightly different, or may be organized differently.