
This guide illustrates the process of connecting an Araknis router to our public VPN and firewall service. The purpose of this is to provide traffic inspection and privitization for all traffic to and from an Araknis router. Araknis end users benefit from the added network security, and Araknis dealers benefit from monthly recurring revenue.
Please note, this service is in beta testing and should not be resold..
How does it work?
It utilizes the “Site to Site” VPN feature of the Araknis router to connect to a Fortigate firewall that is hosted in the Microsoft Azure public cloud. All traffic in and out of the Araknis router is scanned by the firewall before it comes or goes.
Can I try it?
If you have an araknis router in your home or lab, just follow the guide as you would for the customer.
If you would like to try the service, but do not have an Araknis router, you can follow the alternative instructions to use the firewall with FortiClient.
What’s the benefit of a cloud based Firewall?
The firewall intercepts all traffic on on it’s way to the Araknis router. It inspects the in real time to find/destroy and malware destined for the LAN behind the Araknis router. It will also filter out known botnet servers to potentially render existing malware useless to the intruder.
It can also be customized to protect devices like NVR’s and URC Total Control systems that require ports that are open to the world.
Since all of the traffic is inspected before it reaches the Araknis router, it means that some protection is also afforded to and from devices that can not run anti virus software. This includes TV’s, control systems, smart fridges, or anything else that has an internet connection and potential vulnerabilities.
Last but not least, it can be customized to block “call home” traffic from various equipment from shady vendors. For example, you can block all traffic from Dahua or Hikvision cameras back to China.
What’s the benefit of a VPN?
The raw VPN, without any firewall inspection, provide anonymity. The places you send traffic to will not know where you are from. They will only see the public IP address of the firewall service itself.
This is also true for the internet service provider. They will see all the outbound traffic going to the firewall service, but it will encrypted so they wil not be able to read the packet data. They will see the encrypted traffic go to the firewall service, but won’t know anything beyond that.
Does it affect my speed?
It will not affect the beloved speedtest. it will however add anywhere from 5ms to 25ms of latency from the source to the destination. This is only the result of the extra stop it must make before returning home to the Araknis router.
How do I set it up?
The setup process can be broken down into 4 steps. Prior to this, you must ensure that the router is receiving a public IP address on the WAN interface. Alternatively, you may set a DMZ for the Araknis router on your ISP equipment.
If you need help setting this up, you can try and reach me on Discord, JT#8301.
Step 1: Enroll in AraknisDNS service.
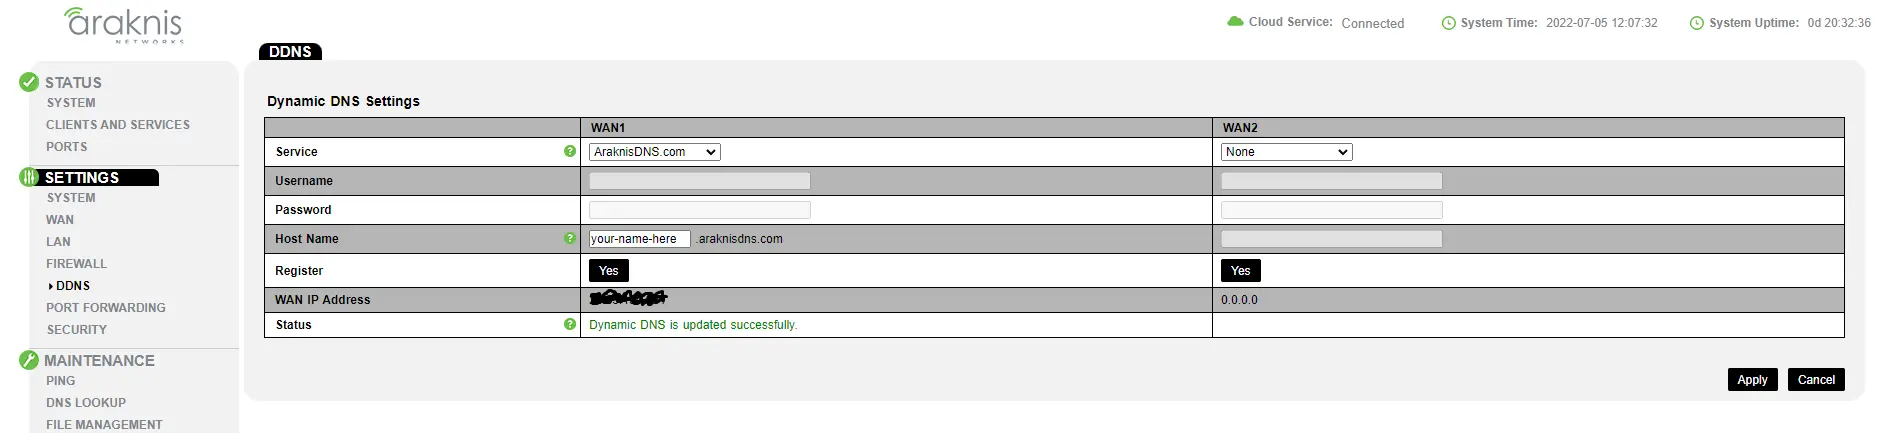
Where it says “your-name-here” you need to create a unique hostname to register with the AraknisDNS service. For example, entering “smith123” would create the DDNS address of smith123.araknisdns.com. Select “Appy” when complete. Reload the page and make sure it says “Dynamic DNS is updated successfully” and did not automatically change your host name because it was not unique.
Step 2: Configure the Site to Site VPN
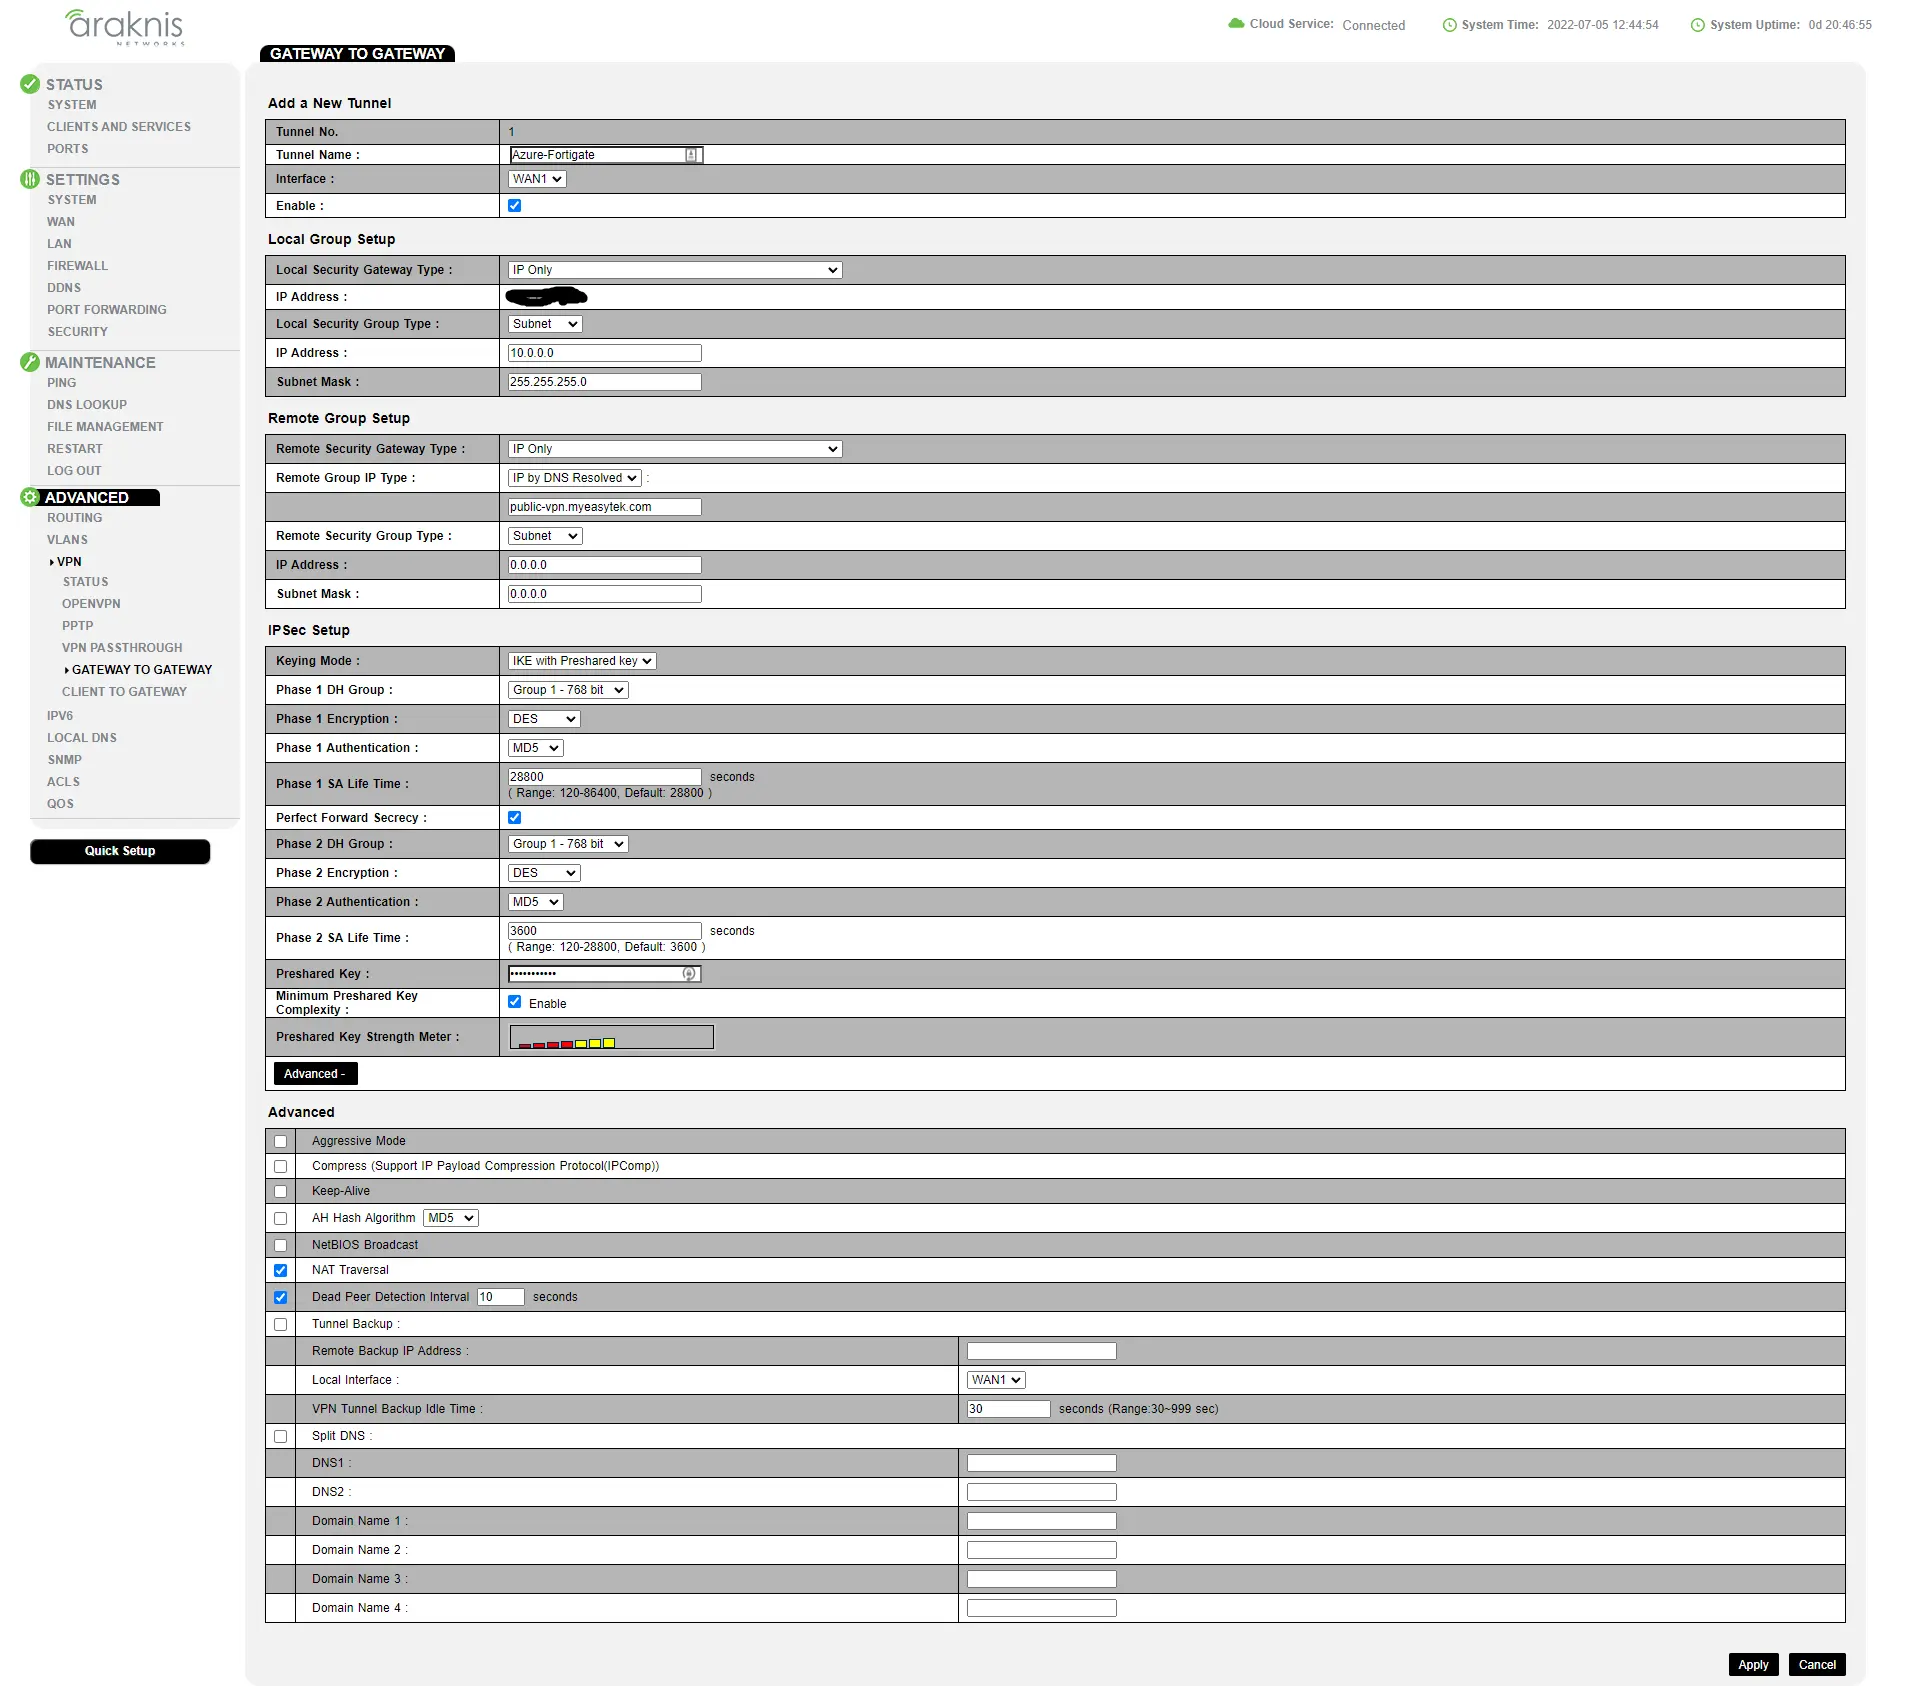
Depending on your firmware version, this may be called “Site to Site” or “Gateway to Gateway” VPN. All of the settings here need to match exactly, with two exceptions.
Where is says “IP Address” under “Local Security Group” you should input the LAN address of your router, but replace the last Octet with a 0. For example, if the LAN address if your router is 192.168.1.1 you should put 192.168.1.0 input this field.
Where is says “pre-shared key” please create a complex password that you are willing to share with us, so that we may match it on our end. It needs to be fairly complex.
Step 3: Send the activation request.
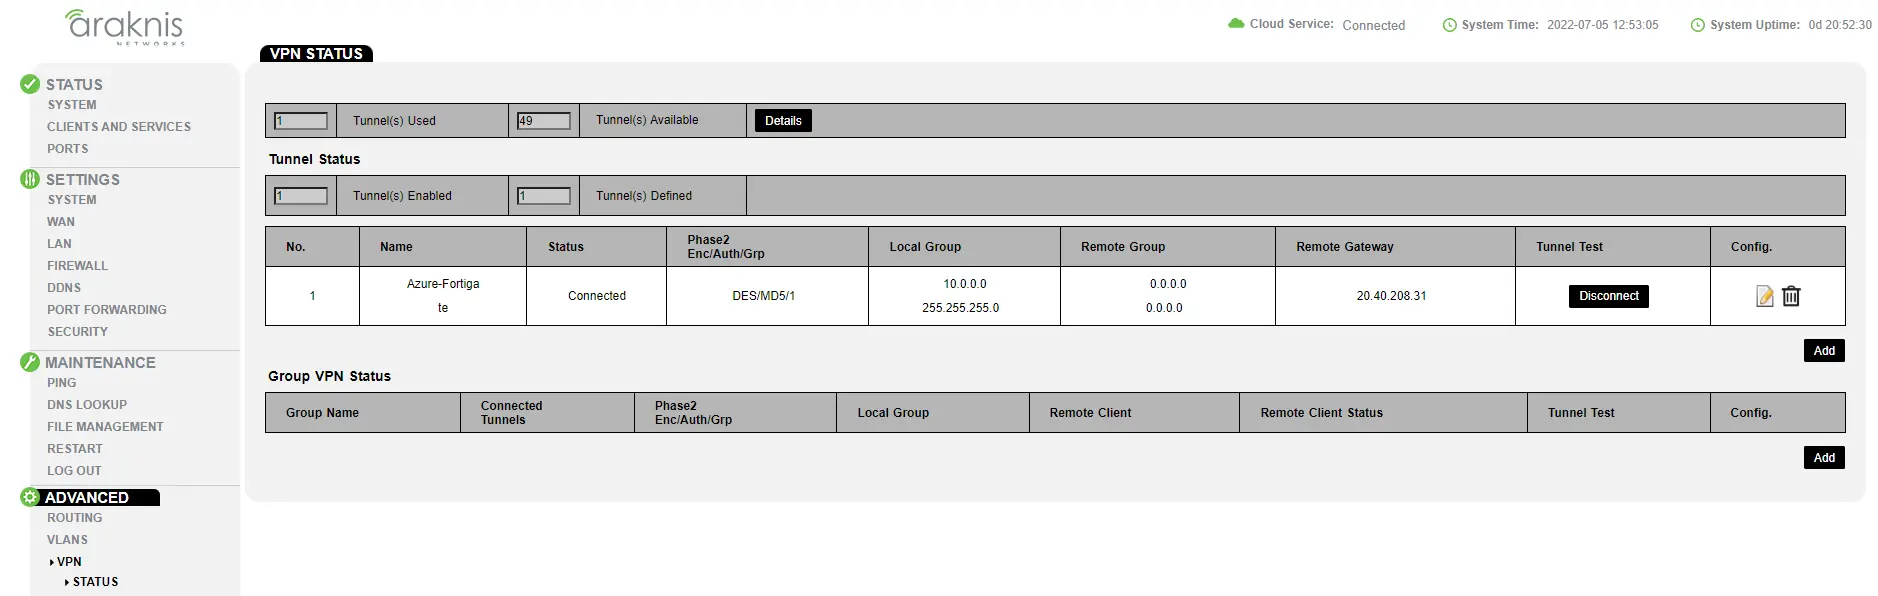
The last step is to send an activation requestion to [email protected]. Put your DNS name from step 1 in the subject line. In the body, include the “IP Address” and “Preshared Key” that you entered in step 2.
When you receive an email saying “request complete,” log back into the Araknis router and go to “Status” under “VPN.” If it says “Waiting for connection” then press ‘Connect” under “Test Connection.” If it says “Connected,” then all of your traffic is currently being inspected.
As another test, you may go to ipchicken.com and see that your IP shows up as 20.40.208.31.
