Audio, Control, DIY Prewire, Elan g!, Lighting, Network, Niles, Peripherals
Structured Cabling Wiring Guide – Low Voltage Wiring for Smart Home
Mar
This is a guide on how to prewire a house for smart home systems including distributed video, whole home audio, surround sound, ethernet network, and other smart home devices including lighting controllers. We’ll focus on the required low voltage wiring needed to build a structured cabling scheme that will keep you flexible enough to install virtually any type of av system when construction is complete. Here are the sections available:
The links include methods of wiring particular devices, but let’s consider the overall process.
Consider our full service project mangement service.
Step 1: Create a Structured Cabling Plan
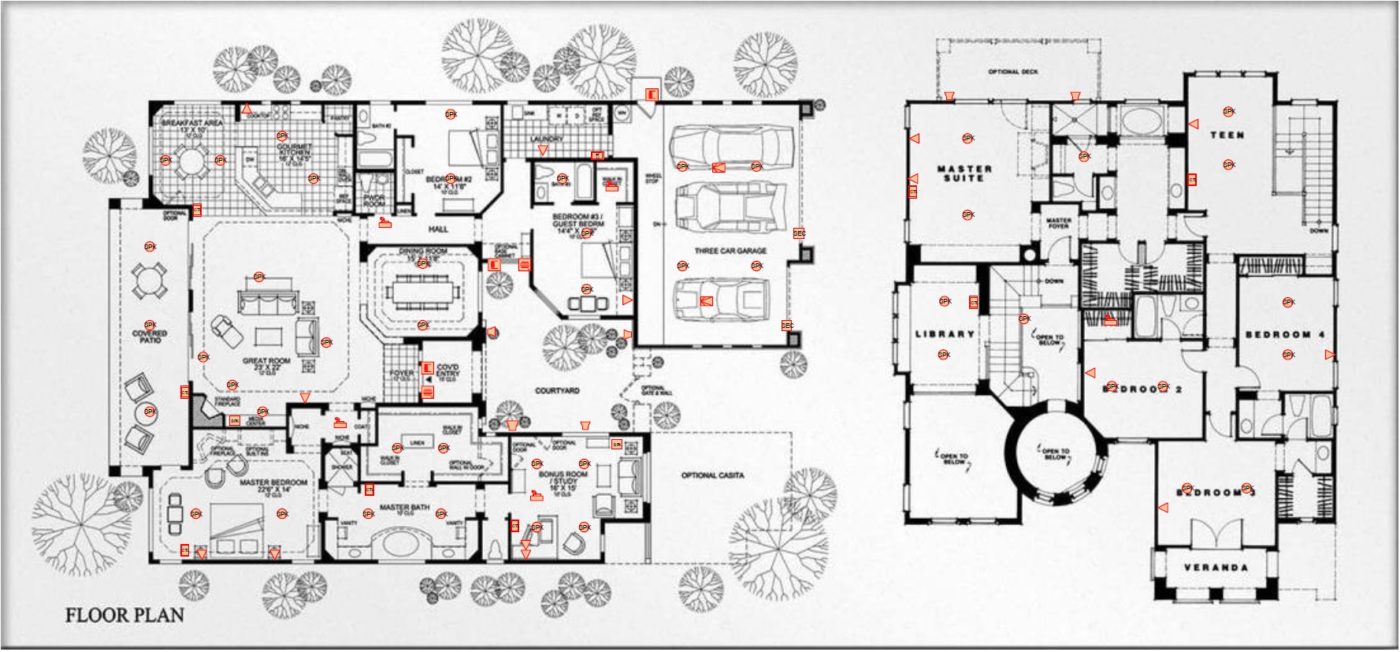
The first image in this post shows a simple low voltage cabling plan to create a flexible structured wiring design. While not all plans may have as many devices, the principal remains the same in that it’s important to put pen to paper before beginning. This allows you to view your system as a whole instead of a group of rooms. We suggest having some guidance when you create your plans so that nothing is overlooked during the initial prewire. It’s important that nothing is overlooked because once the drywall is up, pulling wire becomes exponentially more difficult if not impossible without doing damage.
We help create pre-wire plans as a service, so if you’re having any doubts let us collaborate to make you some great plans.
Step 2: Procure Materials
It’s time to select the cable to be used for the low voltage wiring, and to consider all of the extra installation materials that may be necessary. Since you have a plan, you should be able to make fairly accurate material estimates without creating to much waste by over ordering.
Low Voltage Wiring Selection
If you find that you’re requiring over about 10,000′ feet of wiring, you’ll want to make sure that wire dispenses easily from it’s box. I always recommend pulling from a spool inside of a box, but a nest in box will suffice as well. Some cable dispenses more easily from a nest than others, and if you need any advice please ask. Pooling directly from wire spools that are not in a box is not recommended because you will not be able to pull as many cables at once and altogether it will just be more cumbersome. Here’s some of our general tips per type of wire, and of course make sure all of your wire is rated for in-wall application (CL2 or CMR rated).
- Speaker Cable: 16/2 or 16/4 Oxygen Free Copper (OFC) minimum 65 strand
- Cat 6 Cable: 23 AWG at least 550MHz sweep tested with only a HALF spline
- Coax: RG-6 Quad Shield with Solid Copper Core (No CCS)
You may notice that I don’t recommend using a full spline. Low voltage wiring is only as good as it’s connectors and it’s much easier to terminate Cat 6 with a half spline than a full spline. So long as it’s sweep tested to at least 550MHz it’s fine in my book.
Other materials
It’s important to have the right materials in terms of device back boxes, mount hardware for the low voltage wiring, as well as structured cabling enclosures. As you’re pulling, you’ll be developing large trunk lines as the everything gets closer to the structured cabling enclosure or av equipment rack. At these points you’ll want to be using D-Rings or J-Hooks if the wire is not passing through wood framing. D-Rings are meant for when the low voltage wiring is running perpendicular to the joists, and J-Hooks are made for when it’s running parallel. You’ll also want a couple jars of insulated 3/4″ romex staples to fasten wire down when it is close to it’s end point or for when it’s only a small bunch of cables.
You’ll also want to make sure that you have all of the proprietary boxes and brackets for the equipment that is unique to your job. For instance, if we were using Niles 7″ in-ceiling speakers we would want to have enough NCB7C preconstruction speaker brackets to prepare for all the speakers. You’ll also want to make sure you have your tv enclosure back boxes on hand as well so that you can show them to the electrician and explain how you need the outlets mounted in those boxes.
Step 3: Mount All of the Back Boxes and Low Voltage Wiring Hangers
Before pulling any structured cabling, be sure to mount all of your devices first. This allows to to “save” the space in question so that other tradesmen don’t use your space unneccessarily. It also gives other trades time to raise objection to a particular devices before you’ve gone through the trouble of moving wire. Not only that, but once you have everything up and mounted you can get into a good rhythem when it’s time pull the cable without having to stop and find your drill.
Mounting the low voltage wiring hangers like d-rings and j-hooks allow you to methodically plan your wire routes for efficiency. You’ll be able to see the bigger picture when mounting everything at once, which is much better than trying to figure it out on the fly.
Step 4: Pull the Low Voltage Wiring
Time to get the structured cabling in place. Generally, I recommend pulling from the head end to all of the devices. This allows the boxes to be stationary and not lugged around the jobsite. It also makes it easier to pull large groups of wire at once.
Always be aware of other trades and how they may impact your wiring. We know that trim carpentars are going to be shooting finish nails through baseboard and crown, so it’s best not to drill holes through framing that are either too high or too low. We know that drywallers are going to be using 1″ or 1 1/4″ Drywall screws, when drilling through studs we want to be directly in the middle of the stud, and when drilling through joists we want to be at least 2″ above the level of the drywall.
Try to keep your wiring away from lighting fixtures that may generate electrical noise and heat. Generally, this cannot be avoided 100% but make sure that you’re always at least several inches away.
The last step of pulling the wire is protecting it. You should be fastening nail plates where wire is passing through 2×4 framing, especially when it is going vertically from one floor to another. This means nail plates on header and footer boards of partition walls everytime a wire is passed through, and be sure to use a nail plate on BOTH sides of the stud.
Step 5: Terminate and Tie the Cable
Terminatating the cable at this point is optional, but tying it down is not. Go to the endpoint of everywhere and ask yourself, “is this tied so that when the drywaller will not damage my wire?” Drywallers are pretty indiscrimate with their roto zips and you need to take care to make sure that if they miss and miss horribly that your wiring is not going to get in the way.
It is highly recommended that you terminate the wire at this point so that is can be tested, verified, and generally cleaned up. The exception is if there will be spray foam insulation, in which case you should not termiante because it’s going to make a mess of your connectors. By using keystone inserts, you can terminate the wiring now and then snap it into the wall plate when it comes time to trim. This applies for low voltage wiring such as Cat 6 and RG-6Q that use RJ45, F, or RCA connectors.
At this point you may also terminate the wiring into your structured cabling enclosure. Your builder will appreciate this because it will make the closet very neat because it will take a lot of your extra wiring off the floor and will also protect your wiring once the structured cabling enclosure has been covered by it’s door. Be careful to NOT terminate wire into this enclosure that will be used for HDBT, we want to leave them long enough to go directly into the equipment. I also recommended keeping the speaker wire out of the enclosure as well. Structured wiring enclosures should be reserved for Cat 6 and RG-6 that is for ethernet network, telephone, or any application for Coax cable.
Once the wire is terminated on both ends, you are free to test it. After testing, be sure to wrap your connects in a small plastic bag so that if the painters spray your connects will be covered.
Great article. I wish as a new home builder via a contrctor I could print this to refer back to it. Thank you
This post was very helpful to me getting back into the low voltage wiring fields
Thanks for the reminder that it’s also important to be mindful of the voltage of used by the cables when arranging them. I’d like to know more about cabling services because I recently found a nice office that I could use for my future business. Its layout is a bit strange so I can imagine that it will take the imagination of an expert to get its cabling right.