DIY Prewire, Video
Low Voltage Wiring – Structured Cabling for TV Displays
Feb

This is the first post in a comprehensive series on low voltage wiring and structured cabling. We’ll be discussing how to wire your home for TV during construction or renovation in such a manner that leaves you flexible to either use an HDMI video matrix or local sources behind each display. There are essentially 3 easy steps:
- Pull two Cat 6 and two RG-6Q to each display location.
- Install a back box for structured cabling and TV outlet
- Trim the low voltage wiring in the structured cabling enclosure
Purchase customized plans for a DIY Home Automation prewire.
Best Low Voltage Wiring for TV Display Locations
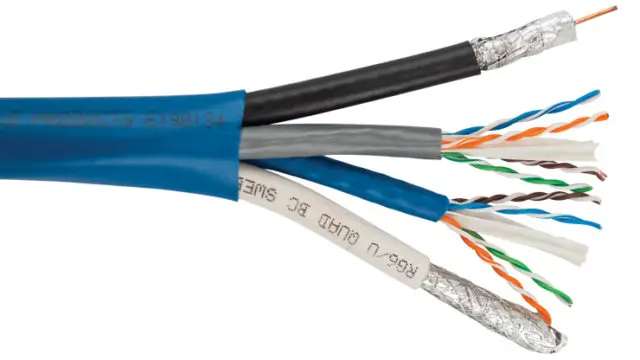
The idea is to be left flexible for various video configurations when it comes time to install. From the head end, or equipment rack, pull two Cat 6 and two RG-6Q cables to each display. This is the bare minimum required, but should serve nearly any configuration. Another option would be to combine all of the low voltage wiring into a single structured wiring cable like SCP’s model HNC8. This cable combines two Cat 6 and two RG-6Q inside of a single jacket (first image). This allows you to pull the four cables at once while also providing a more durable jacket. Lastly, if the run to your av equipment rack is less than 50′, it is absolutely worth it to add a premade HDMI cable to the mix.
The theory behind this mix of cables is that it leaves you open to any video configuration when it comes time to install. If you are installing an HDBT Matrix then one Cat 6 will be used for HDBT while the second Cat 6 will be used for network. This also leaves 2 available RG-6 to return audio from internal display sources and/or the optical output of the TV in the case that analog outputs of the sources devices cause lip sync issues.
It also leaves you open to installing source devices behind the display. Examples include a Tivo Vox Mini, a Direct TV genie client, a Comcast STB client, an Apple TV, or an Amazon Fire TV. In this case, one or both of the Cat 6 may be used for network, one RG-6Q can be used for cable/satellite signal if required, and another can be used to return either digital or mono audio back to the audio system to play through the in-ceiling speakers (while still providing for audio return of internal display sources).
Best Back Box for TV Structured Cabling
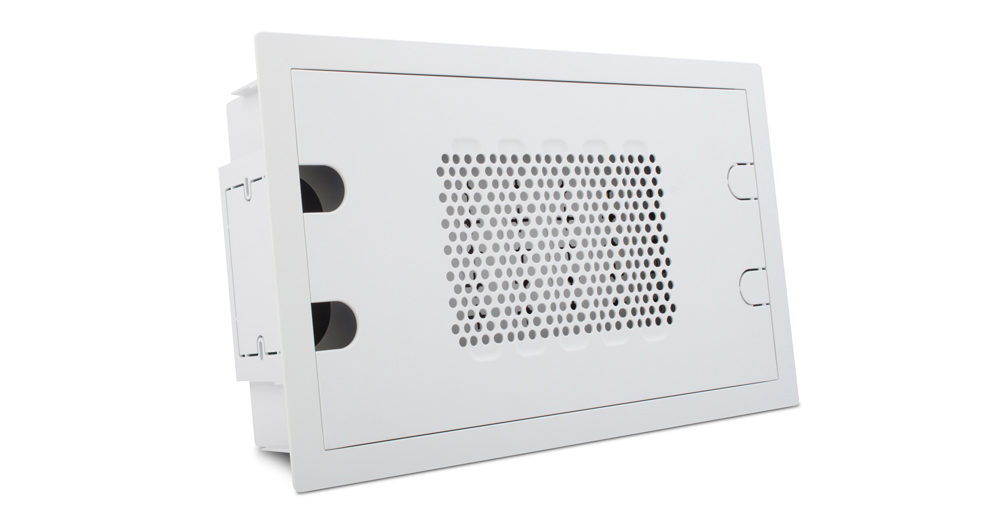
I will always recommend the SM-RBX-8, SM-RBX-14, or their PRO counter parts (same but metal for where code prohibits plastic). These make the best TV back boxes for low voltage wiring because they allow using the wall space to house components that must be placed behind the TV such as set to boxes, HDBT Extenders, and DAC’s. There is an included divider for creating two layers of equipment, and vent holes in the front cover so that it can breathe.
There’s also the fact that it contains a knockout in the shape of a gem box for outlet installation. This allows the outlet to face sideways towards the interior of the box, which makes an all in one solution for the low voltage wiring as well as the line voltage. By using this box, you’re going to allow the TV to be mounted as close to the wall as possible. Installation always look better when using a back box.
In order to prepare for installation of the back back during the low voltage wiring phase (during construction prior to drywall), install bracket SM-RBX-8-BKT or the 14″ model SM-RBX-14-BKT.
Of course, you could also use single or double gang open backed box to later be trimmed with a low voltage wiring cable entrance plate, but this may require your TV to be spaced from the wall
AV Equipment Rack Side
Terminate both of the RG-6 and only ONE of the Cat 6 cables in the low voltage structured wiring enclosure. Leave the remaining Cat 6 cable with enough on it to reach a potential HDBT Matrix. There’s no reason to cut these short, low voltage wiring is cheap, mistakes are expensive.
Great, exploring the nuances of low voltage wire on this blog was truly enlightening. The insights into its versatility, energy efficiency, and safe usage are invaluable for anyone seeking to enhance their outdoor lighting and landscaping projects.